Product
How it works Features Apps Free digital signage templates Digital signage hardware On-premise digital signage
Solutions
Choose your business and find out how to increase efficiency
retail
Retail

Supermarket & shopping mall

Grocery store

Pet store

corporate
Corporate

Meeting & conference room

HR

Lobby

Breakroom

education
Education

School

University

event
Events
Digital signage for government, preview
Government
Hospitality
Hospitality

Resort

Hotel

Night club

Spa

Beauty industry

digital signage for healthcare
Healthcare

Hospital

Medical center

Veterinary

Pharmacy

Dental

Waiting room

Manufacturing Preview
Manufacturing
Modern glass building with illuminated entryway and light trails from passing cars.
Enterprise
menu
Digital menu

Quick service restaurant (QSR)

Cafe

Bar

Drive thru

Pizzeria

Food truck

Digital signage for restaurants, preview
Restaurant, cafe & bar
Digital Signage for Entertainment, amusement parks
Entertainment

Arena and stadium

Cinema

Museum

Amusement park

Casino

fitness
Fitness
banking
Banking
advert
Advertising

Digital out-of-home (DOOH)

Indoor

transportation
Transportation

Airport

Gas station

Bus station

Train station

Parking

Car Dealership
Car dealership
real estate preview
Real estate
Digital signage for church, Preview
Сhurch
Resources
Use cases FAQ Knowledge base Blog Downloads
Company
About us Reseller program White label Contacts
Pricing
AI Wizard
new
Log in Try for free
English language
English
English
Italiano
Español
Português
Português (BR)
Français
Deutsch
Русский
中文
Try for free

14 days • No credit card • Cancel anytime

  • Home
  • Knowledge base
  • Schedules
  • Creating and editing the schedule

Creating and editing the schedule

Creating a Schedule

  1. In the schedule tab, click the Add Schedule button.
  2. Enter a name for the new schedule and click Save in the opened modal window.
  3. In the weekly schedule table, reserve the days for the daily schedule and click Add daily schedule.
A daily schedule is a schedule that is played on specific days of the week. This schedule can contain many playlists or screen layouts scheduled for different time intervals throughout the day.
  1. Enter a name for the daily schedule and click Add.
  2. A time bar where you can add playlists or screen layouts opens below the daily schedule. Click Add content.
  1. Select a playlist or screen layout in the right sidebar and click Set time, then specify the time range when the content should play and click Save.
  1. You can create multiple daily schedules and assign them to different days of the week.

Daily schedule editing

Daily schedule settings
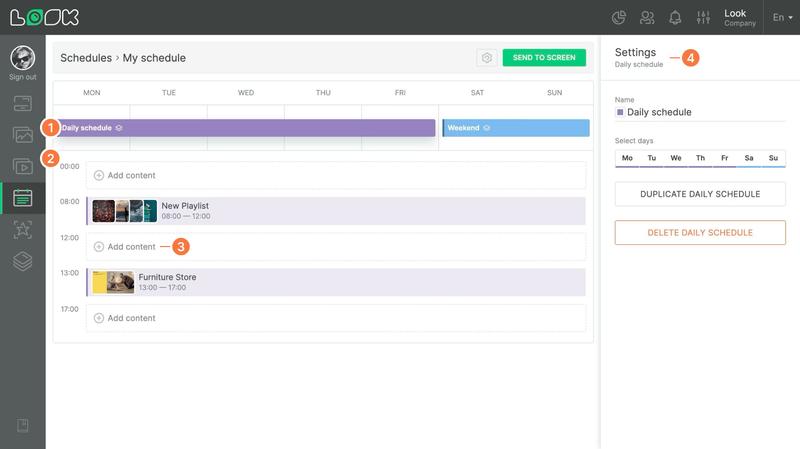
Daily schedule settings
  1. Click the color bar of the desired schedule in the weekly calendar to continue with editing the daily schedule.
  2. All content of the daily schedule on the time bar opens below, content is colored in the colors of the selected daily schedule.
  3. Empty cells labeled Add content — are free time ranges where you can add playlists or screen layouts.
Content cannot overlap in time, so if you want to add a new playlist or screen layout to an already occupied time range, you must first delete the previous content or edit its playback time.
  1. The right side panel contains the selected daily schedule settings.
  1. Here you can change the daily schedule name and color tag.
  2. You can quickly remove or assign a daily schedule to the desired days of the week in a mini weekly calendar.
  3. You can duplicate or delete the daily schedule in the settings.

Replace and delete daily schedule content

  1. Click the Replace icon on the right side of the playlist or screen layout to replace one content with another, then select the new playlist or screen layout in the right sidebar and click Replace.
  2. Simply click the Remove from schedule icon on the right side of the content to remove a playlist or screen layout from the daily schedule.

Editing the time range of content
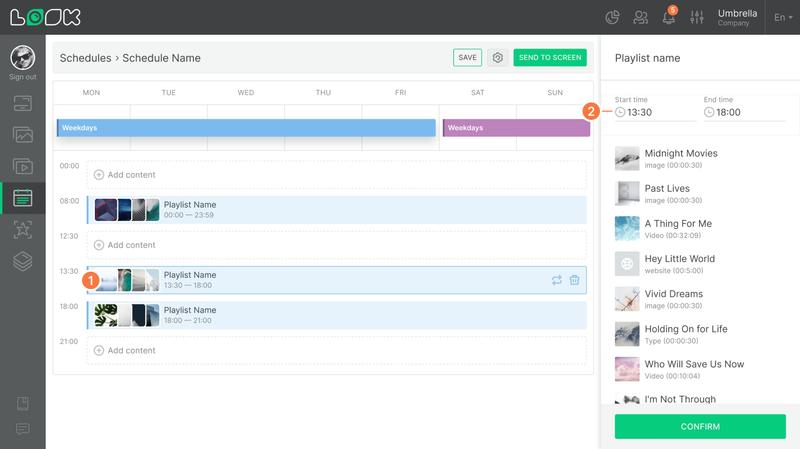
Editing the time range of content
  1. To open the settings, click the desired playlist or screen layout in the schedule.
  2. You can edit the start and end times for this content in the sidebar that opens.
Read also: Schedules Interface, Adding A Schedule To The Screen, Weekly Schedule Settings
Can't find your answer?
Contact Support

Schedules

Adding a schedule to the screen
Creating and editing the schedule
Schedules interface
Weekly schedule settings

Categories

Getting started
Screens
Actions
Company
Content
Playlist
Schedules
Screen Layouts
Apps
Billing
Hardware
Product
How it works Features AI Wizard Apps Free digital signage templates Digital signage hardware On-premise digital signage Pricing
Company
About us Reseller program White Label Contacts
Solutions
Retail Hospitality Banking Corporate Healthcare Fitness Advertising Education Transportation Events Real estate Manufacturing Restaurants, cafes & bars Entertainment Car dealership Government Church Digital signage solutions Enterprise
Resourses
FAQ Use cases Knowledge base Look academy Blog What is digital signage Downloads Alternatives Troubleshooting RSS Best digital signage software Supported operating systems
Instagram link Facebook link X icon LinkedIn link YouTube Icon
Look DS LLC. Address: 1201 N Orange Street Suite #7003, Wilmington, DE 19801, United States
info@lookdigitalsignage.com
capterra-best-valueSoftware Sugest Awardsoftware-advice-customer-supportget-app-category-leaderG2-spring-2025-HighPerformer-Small-Businesscapterra-short-list-2025
Look Digital Signage Software Logo Footer
Privacy Policy
Terms of Service
Service Level Agreement
©2026 LOOK DS LLC